Slicing an LED strip to the ideal length for a cabinet or a display case feels rewarding, yet challenges arise when you have extra segments or must turn a tight angle. With COB (Chip-on-Board) technology, you deal with more than scattered bright spots; instead, you manage a smooth, unbroken light that must remain consistent. Joining these strips again is entirely feasible, but deciding between a soldering tool or a simple plastic fastener relies on the installation location and your level of tolerance for the task.
At Raymates, we have explored LED technology since 2009, assisting people in 30 countries to achieve proper lighting setups. Contractors and DIY enthusiasts often ask us these questions. Here is practical advice on reassembling those trimmed pieces without spoiling the overall effect.
Is It Possible to Reconnect COB LED Strips After Cutting?
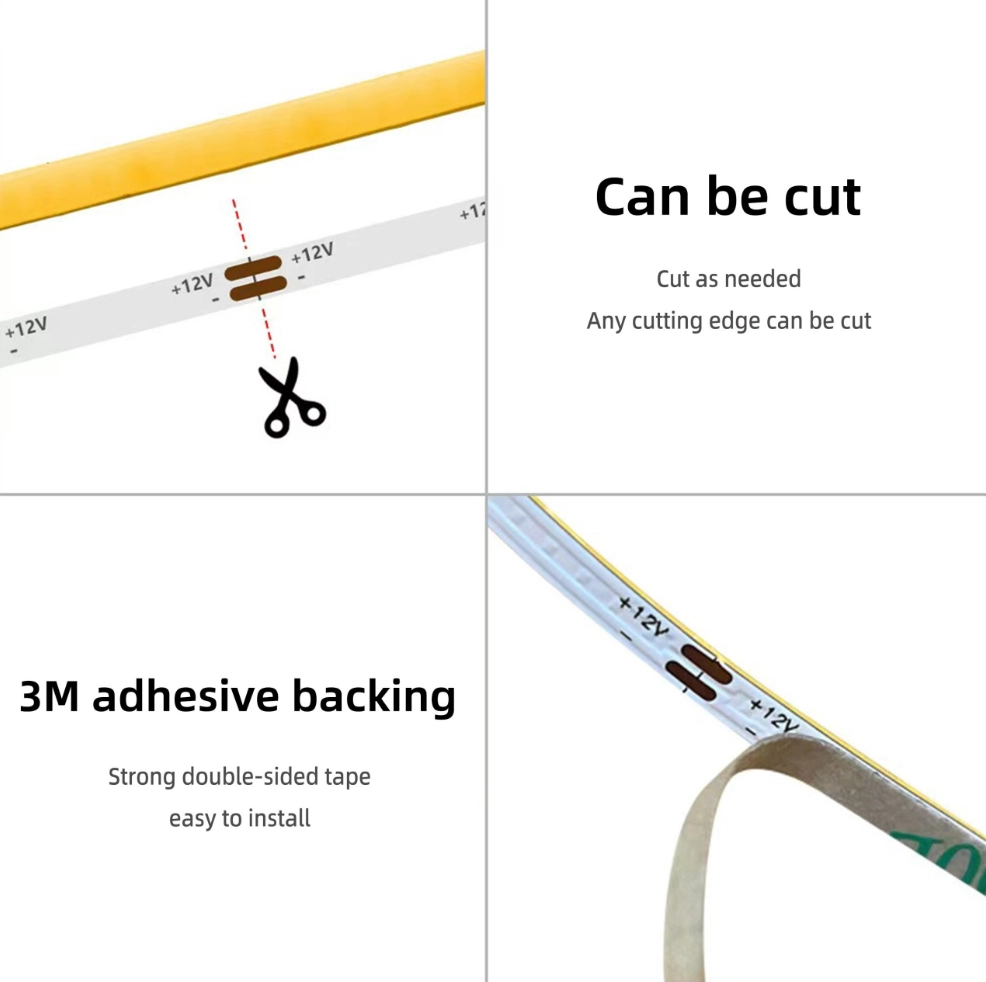
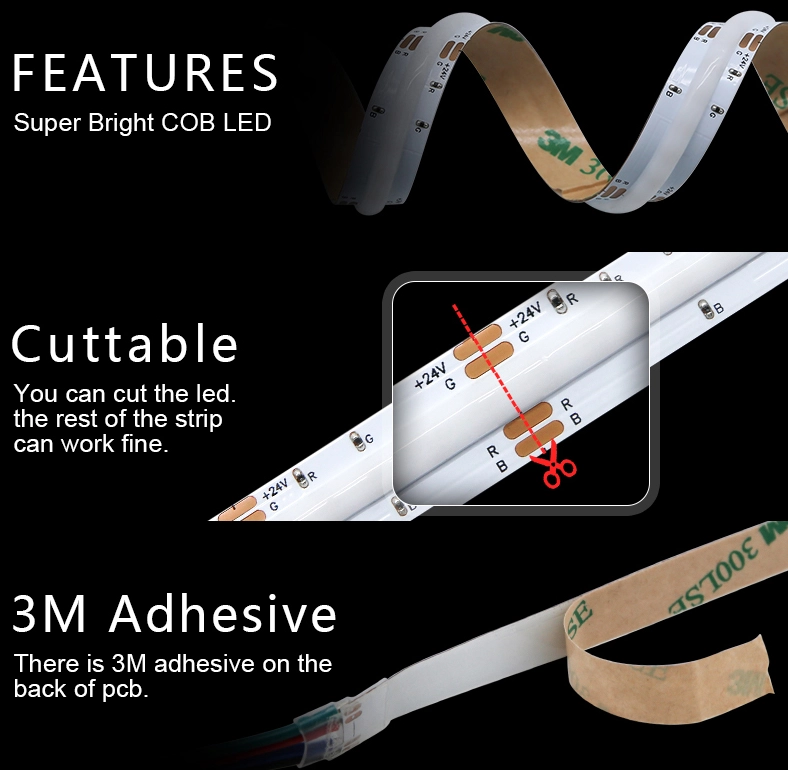
Before focusing on the method, you should determine if the strip you trimmed remains usable. The basic answer is yes, provided you made the cut at the correct position. COB strips feature small exposed chips fixed straight onto the circuit board. Cutting across a chip ruins that part. However, if you adhere to the designated cut lines—typically shown by a copper area or a small scissor symbol—you can proceed without issues.
Check the Cut Marks and Circuit Path
Each COB strip includes a defined cutting interval, which simply refers to the spacing between secure cutting points. For a product like the Mini Size COB Strip, these indicators sit very near each other since the board measures just 3mm across. Precision becomes essential in this case. Missing the copper pad by even a small amount could disrupt the electrical flow, and the lights might fail to illuminate.
Match the Voltage for a Seamless Look
When combining two segments, they must operate on identical power levels. For instance, a 24V strip cannot drive a 12V portion effectively. Raymates provides options from 3V to 230V, so always verify the markings on the PCB prior to connecting. Mismatching them not only creates an uneven appearance but also poses a risk of fire.
Keeping the Waterproof Seal Intact
For outdoor applications, such as illuminating a bridge or a patio, trimming the strip disrupts the IP65 or IP67 protective layer. Merely fastening them together fails to block water. You will require silicone caps for the ends along with waterproof adhesive to restore the seal; otherwise, dampness enters and damages the LEDs within weeks.
Should You Choose Soldering for Your Reconnection?
After verifying that your strips are suitable for joining, the traditional and dependable approach involves soldering. This method forms a firm physical and electrical link that surpasses the strength of any plastic fastener. If you seek a bond enduring the complete 50,000-hour life of the LEDs, soldering often proves the optimal choice.
Permanent and Low-Resistance Joints
Soldering earns its reputation for good reason. By applying solder paste or wire to connect the sections, you establish a pathway with minimal resistance. This matters greatly for the Super Long COB Strip. Since these strips extend over considerable lengths, a slight resistance at the join can lead to voltage drop, resulting in dimmer light at the far end compared to the beginning. Soldering ensures uniform brightness throughout the entire run.
Tools and Skills Needed for the Job
Soldering requires preparation; you cannot approach it casually. Essential items include a reliable iron, flux to improve solder flow, and heat shrink tubing for insulation after completion. A steady hand is crucial, particularly on slim strips. Yet, once finished, the connection remains secure. Professionals favor this technique for upscale hotel and business installations at Raymates, where adequacy falls short of expectations.
Better Heat Dissipation and Fit
Soldered connections stay compact. They add no extra thickness to the strip, allowing it to fit snugly within narrow aluminum profiles. This aspect aids heat control significantly. With the strip pressed closely to the metal surface, warmth dissipates from the LEDs more efficiently. In contrast, a bulky connector could raise the strip away from the profile, leading to overheating and premature failure.
Why Are Solderless Connectors a Popular Alternative?
Many people lack a soldering iron nearby, and not all wish to master its use. Solderless connectors serve as convenient clip-style adapters that enable linking two strips or attaching a wire by pressing a plastic lever. These have gained widespread favor among home DIY users and fast retail arrangements.
Quick and Easy for DIY Home Projects
For tasks like installing lights behind a television or beneath kitchen cabinets, connectors offer immense convenience. No advanced abilities are necessary. You simply insert the strip into the clip, align the copper pads with the internal pins, and secure it with a click. What might take 20 minutes with soldering becomes a mere 30-second operation.
Flexibility in Navigating Corners
Bending a COB strip sharply around a 90-degree turn risks fracturing the embedded chips. A strip-to-strip jumper connector introduces a short wire segment between pieces, functioning as a flexible pivot. This setup suits the Colorful COB Strip ideally when tracing detailed shapes like a bar counter or an elaborate sign. It allows the strip to adapt to angles without straining the board.
Making Repairs and Changes on the Fly
Suppose you relocate your display or a segment malfunctions. A soldered joint demands cutting and removing the solder for fixes. Connectors, however, permit simple detachment and replacement. In scenarios like event decorations or exhibition stands, this adaptability holds tremendous value.
How Do Different Raymates Products Handle Reconnection?
Various lights demand unique handling. A 3mm-wide strip for a jewelry display requires finer care than a robust outdoor version. Since Raymates manufactures all items in our facility, we engineer them to facilitate connections effectively.
Precision for the Mini Size COB Series
The Mini Size COB Strip boasts an ultra-thin profile, which enhances its appeal but limits margin for mistakes. Common connectors often exceed the strip’s width, appearing awkward. For these, we advise micro-soldering or specialized COB clips that preserve the light output area. Maintaining that smooth illumination across the joint remains key.
Power Stability for Super Long Runs
The Super Long COB Strip handles extended layouts well, but longer distances amplify voltage drop risks. When rejoining sections, soldering paired with a heavier-gauge extension wire is our suggestion. This approach sustains strong current flow, so lights at the 10-meter point shine as vividly as those near the start.
Managing the RGB Signals in Colorful Strips
The Colorful COB Strip involves more than basic positive and negative wires; it includes four or five channels for various colors. A single misaligned pin in a connector could shift a purple shade to green midway. We supply tailored RGB connectors and controllers, verified to keep color signals aligned precisely over all connections.
Which Method Best Suits Your Lighting Project?
Deciding between options lacks a universal solution, but a suitable choice exists for your particular setup. The decision often hinges on needing a rapid solution or a durable installation that withstands weather conditions.
For Heavy-Duty and Commercial Jobs
When placing lights in inaccessible spots, such as a building’s facade or a hotel’s elevated atrium, opt for soldering. Avoid future ladder climbs due to a loosened or corroded plastic part after two years. Soldering provides a reliable, hands-off option for experts.
For Living Rooms and Hobbyists
Enhancing a home space or assembling a gaming rig benefits from connectors. They ensure safety, perform reliably in indoor dry environments, and conserve time. Select premium connectors designed for COB strips, avoiding outdated SMD types that might create shadowed areas.
Get a Custom Solution from the Experts
Uncertain still? We exist to assist. Raymates goes beyond selling tape reels; we deliver complete packages with tailored designs and setup instructions. Whether requiring a particular power unit or guidance on wiring an intricate bridge, our team offers UL-certified equipment and proven expertise to complete the work correctly on the first attempt.
FAQs
Q1: Will I see a dark spot where I reconnect the COB strip?
A: With an appropriate COB-to-COB connector or a neat solder bond, the smooth light flow should remain nearly flawless. That said, a connector featuring a wide plastic span might produce a small 2-3mm shadow. Soldering offers the surest method to eliminate any dark areas.
Q2: Can I use regular LED connectors for COB strips?
A: Not consistently. Traditional SMD strips display separate LED chips with spaces between them, whereas COB chips cluster densely. Ordinary connectors could compress the yellow phosphor layer and harm the chips. COB-dedicated connectors, built to bypass sensitive zones, provide the safer choice.
Q3: Does reconnecting the strip void the warranty?
A: Trimming and reattaching the strip forms a routine installation step, so it typically preserves the warranty if you respect the cut lines and avoid PCB harm. Nevertheless, failures from faulty soldering or a breached waterproof seal generally fall outside coverage. Test all joins before permanent fixing!